For the physics simulation itself, see here! For some basics, see Drawing with Physics!
General Settings
When using physics-tank to make art, some settings are much more conducive to the process than others. When I discuss techniques below, you can just assume that I've set parameters to ensure that:
- Trails are active and the trail length is infinite (so our work doesn't gradually fade away)
- Color randomization is on (so when we create a lot of discs, we can tell their trajectories about and get local variations in color)
- A non-infinite disc persistence (if the disc persistence is infinite, discs will remain in your session indefinitely, moving around and causing all kinds of trouble)
- "Fill" is active so our discs are color-filled rather than hollow (i.e. filled with the default dark blue background color). Hollow discs look cool when disc persistence is infinite but, otherwie, they will fade out leaving dark blue monochrome regions.
Backgrounds
Monochrome Backgrounds
While physics-tank has a transparent background by default (so you can set a background as whatever you like before or after you make your art piece), physics-tank can make colorful and painterly backgrounds like the one below as well:

This particular background was made with the following parameters
- No downforce (e.g. 0)
- Max gravity (e.g. 2000)
- Max coefficient of restitution (e.g. infinity)
- No friction (e.g. 0)
- High persistence (e.g. 99)
- Velocity vector display off
- Max disc radius (e.g. 100)
- Typical time-step (e.g. 0.02)
With these parameters set, you can use "pour" mode to create a large number of fast moving discs of similar colors. Driven by overcrowding and gravity, and un-inhibited by friction or low coefficient of restitution, these discs will bounce against each other and the physics-tank walls rapidly leaving large blobs of color. As they fade out, these blobs of color will become transparent and blend with each other to create a soft painterly background.
Multi-color Backgrounds
It's also possible to make more complex backgrounds. For example, using the above parameters but reducing disc radius (e.g. to 14.4) creates small discs. Because these discs are smaller, they move slower (due to lack of overcrowding) and fill less of the physics-tank with color. As a result, you can pour discs into physics-tank with varying target colors to get more complex backgrounds like this one:
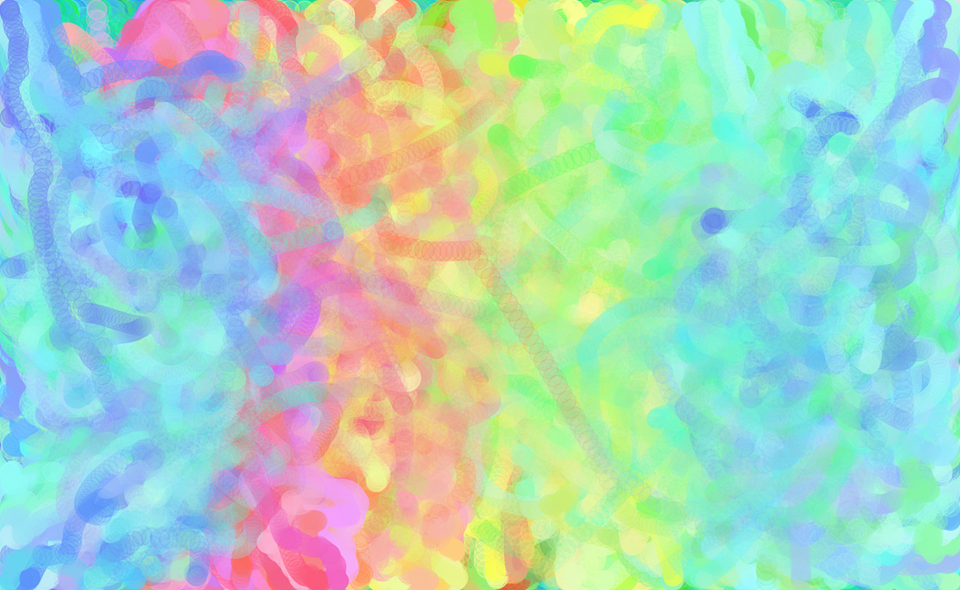
Notice that, if you look closely, you can see individual disc trajectories before they fade out. Overall though, this background retains the painterly vibe of the early one with a more complex color pattern.
Once you get a background you want, I recommend saving your progress by copying the canvas to clipboard and storing it wherever you like. If you make a mistake or ever want to re-use this background, you can restore the canvas to the background by copying your saved background and CTRL+V'ing it back to the canvas.
Landscapes
Chaotic Landscapes
Now that you have a background, you can carry on to the rest of whatever you want to create. You might want to create a landscape. You could create an impressionistic landscape like this using similar techniques used to make the background:
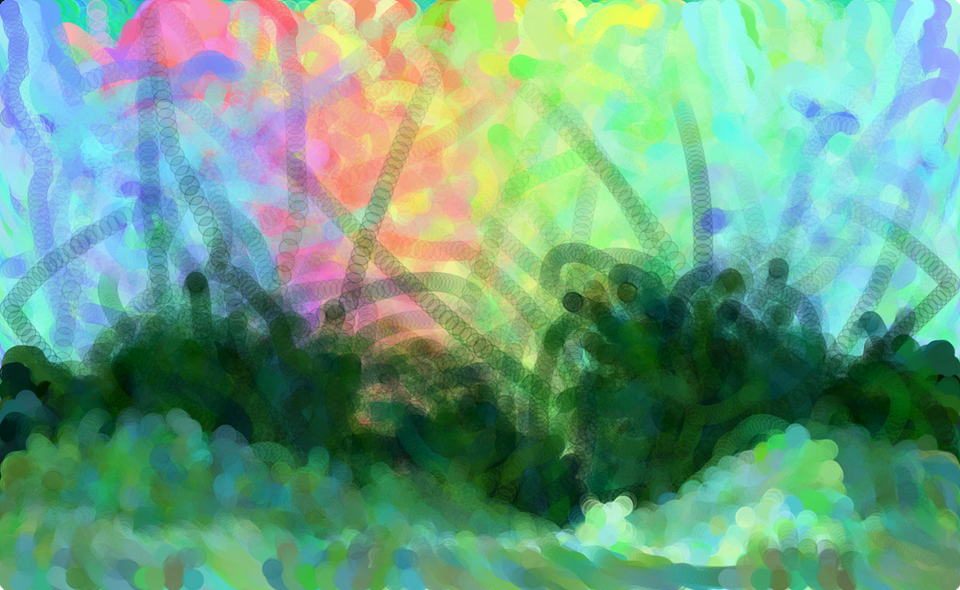
This landscape was created using the exact same parameters used to make the background, except using different disc persistences with different disc colors. It also leverages the gravitional attraction between discs to (softly) control how they move. Specifically, creating this landscape can be broken down into the following steps:
- Set your discs to target a dark green color and ensure they have high disc persistence (e.g. 99). Start pouring them into physics-tank about a third of the way from the bottom and drag your cursor down. The (higher-up) discs you created initially will be pulled toward the (lower-down) discs you created more recently, resulting in downward trajectories that keep (most) discs in the lower third of the image. If you want the discs to rise up a bit, you can hold your cursor in place or even raise it a little bit for brief periods of time to make the landscape more dynamic.
- Set your discs to a lighter green color and lower the disc persistence (e.g. to 50). Now you can repeat the above process: Start pouring them into physics tank about a sixth of the way from the bottom and drag your cursor down. Because of the lower disc persistence, discs that are traveling upward will most likely fade out before interrupting the dark green landscape layer we just made.
- Now, set your discs to an even lighter green color and lower the disc persistence again (e.g. to 25). Now you can simply pour discs into the very bottom of the canvas. They will bounce when they hit the bottom border which gives their trajectories a consistently upward motion. The discs now won't last very long at all so you can freely raise and lower your cursor to make the landscape more dynamic.
- Finally, set your discs to one of the earlier colors to touch up anything about the landscape that looks off.
Hilly Landscapes
For some art pieces, this type of approach might be too chaotic. There is a simpler way to ensure discs stay at the bottom of the screen: increase downforce (e.g. to 2000), zero-out gravity, and reduce the coefficient of restitution (e.g. to 0.9). With these settings, one can make hilly landscapes like this (sun added for extra flare):
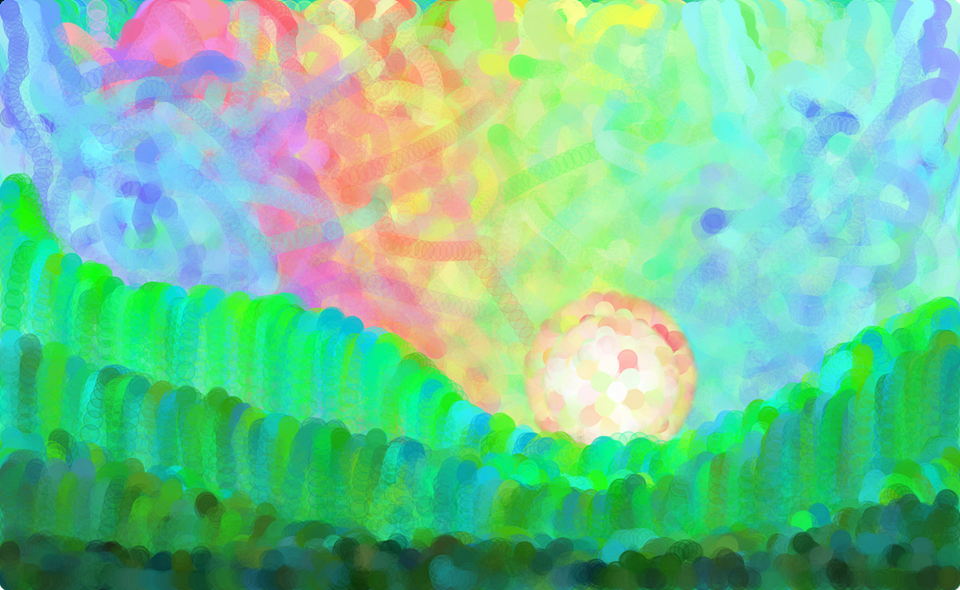
The reason this works is pretty simple: No gravity between discs and high downforce ensures all discs fall down. If discs bounce, a lower coefficient of restitution ensures they cannot recover their original height. To prevent too much bouncing, which can result in chaotic looking disc trajectories, this example also used a reduced disc persistence of 20 so discs would fade out relatively quickly.
With these settings, you can simply pour discs while dragging your cursor across the screen to create hilly landscapes that appear to have steep drops. By layering "hills" of different colors over each other, one can create a dynamic looking landscape with lots of control over height.
Geometric Landscapes
Sometimes you want a less chaotic landscape and relying on downforce isn't enough. For example, you may find the limited control over how far discs fall or appearance of steep hills undesirable. In these cases, you can create landscapes by drawing hard boundaries that discs cannot cross, and then introducing discs where appropriate to fill in the desired colors. For example:
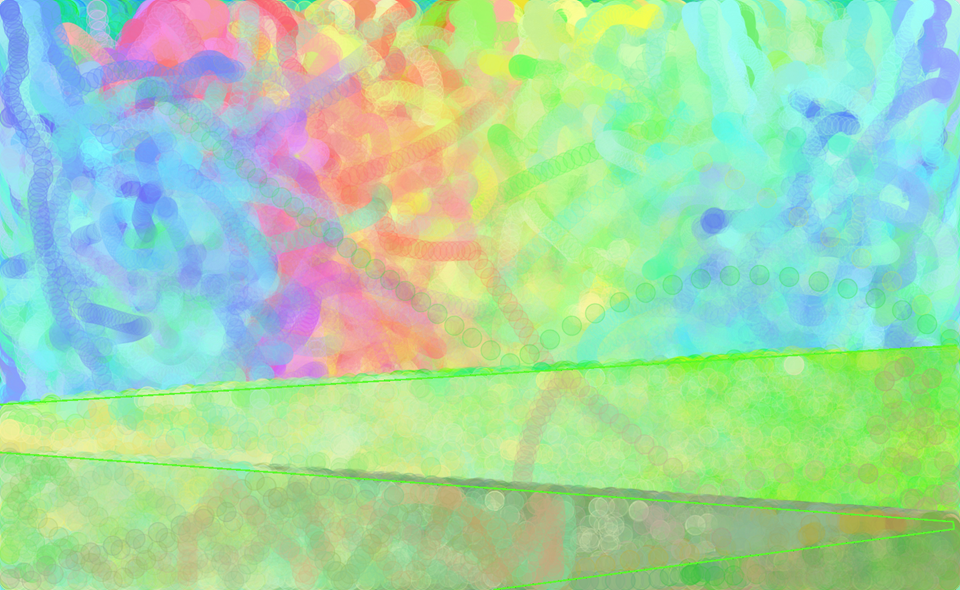
To do something like this, first make sure your background is copied to the clipboard. Then, right click your cursor where you want to start drawing your barrier, drag it to where you want to finish drawing it, and release. Note that as you drag, the barrier will leave after-images of itself on the canvas where its previously been which will disrupt your image. However, since you copied your background before making the barrier, you can CTRL+V to restore it to its earlier state while keeping the barrier you just added. This means you can create a barrier safely without worrying about messing up your canvas!
In the above landscape, I created three barriers with suitable colors and then filled the areas they contained with discs. For the discs, I used fairly ordinary settings for the most part (zero downforce, gravity at 500, coefficient of restitution at 1, zero friction, disc persistence of 99, disc radius of 14.4, etc). The only unusual thing I did was max out the time-step at 0.1, to ensure the discs would quickly cover each region with color.
In each region, I also used multiple target disc colors with variable levels of disc persistence to control how much discs of each color type spread out. This allowed me to create distinct and localized color gradients which are easiest to see in the top two layers of the landscape. As you can also see, the segments are themselves visible and create hard color boundaries without appearing hilly.
Foreground objects
Just Regular Ole' Drawing
With a background and a landscape, it's now time to add actual things to the picture! Since making actual things requires some attention to detail, it's usually not practical to rely on discs that fly all over the place. Instead, one can set parameters so disc movement is highly limited and then draw like normal. In this case, I made a tree:

Here, I set a low disc radius (i.e. 1) so I could easily create tiny details. I also set a low time-step (i.e. 0.01), and a low disc persistence (i.e. 20) so discs would only travel for short distances before fading away. I also set a high downforce (i.e. 2000) so discs would fall straight down and leave brief trails. I first added brown discs to create the structure of a branching tree and then went over that structure with green discs.
For the most part, this is just regular ole' drawing, but the downward falling trails of green left by the green discs do a decent job of evoking hanging leaves and give the tree a spooky vibe.
Ghosts
With the spooky vibe in mind, I then imagined ghosts hanging on the ends of the branches of the tree. Again, I could take advantage of the dynamics of falling discs to create features that look like ghosts.

Notice that these ghosts look a little peculiar relative to other things made with physics-tank: they clearly end in sharp almost-vertical white lines rather than faded out discs. I didn't do this by drawing barriers. Instead, I adjusted the physics-tank settings to display velocity vectors and specified that these vectors would be white. Furthermore, I adjusted the disc colors used for each ghost to match the color of the background behind them.
The settings for this are very similar to the ones used to make the tree. The only differences are that I further reduced disc persistence to 5; velocity vectors can get pretty long and they don't fade out like discs do. I also increased the disc radius to 5 so discs would spread out more here than they did when I drew the tree. This is why the disc trajectories form a dome-like shape for the ghost heads, rather then falling straight down.
A Spooky Cave
Already, the drawing looks pretty cool but the landscape still seemed somewhat too plain for me. To address, I used some barriers to define an area of the landscape that could become a spooky cave and filled it in with dark brown colors. First, I used a lighter brown to fill the whole region and then used a darker brown to fill the bottom. Within the cave, I added five pairs of eyes to correspond with the five ghosts.
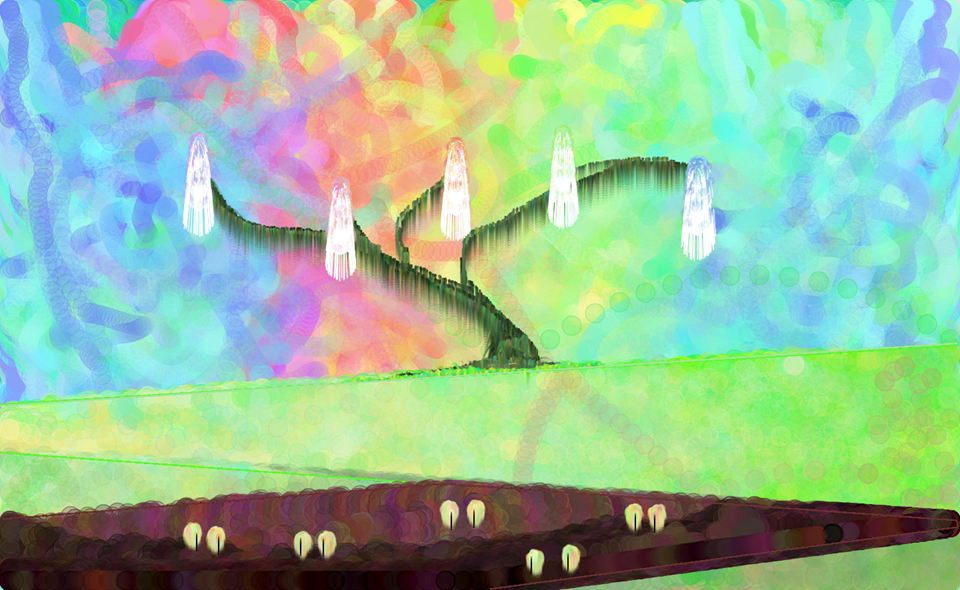
For filling the cave, I re-used the trick from the hilly landscape again using a standard disc radius of 14.4. I set downforce to 2000, time-step to 0.1, and disc persistence to 100 but set all other parameters to prevent movement (e.g. coefficient of restitution of zero and friction of 1). This allowed me to control exactly how much of the cave was filled with one shade of brown or another.
For the eyes, I left downforce at 2000 but set gravity to 2000 so discs would bunch together rather than spread apart. Since I only wanted the discs to fall a small distance, I used a low disc persistence (e.g. 12) and low time-step (e.g. 0.01). Since the eyes are a relatively small feature, I also reduced the disc radius to 3. To define the pupils (the vertical segments), I set discs to display black velocity vectors and used shift+click to add just a single disc to the center of each eye.
Other Techniques
Color blobs
If you're curious about how I made the sun in the background earlier, here's the method: by repeatedly pouring discs into the same spot on the canvas with non-infinite disc persistence, no downforce, and no gravity, you will get impressionistic, circular color blobs. These can be used to make flowers, suns, and so on. By changing the sizes of these blobs by modifying disc radius or disc persistence and layering them, you can produce things like this:
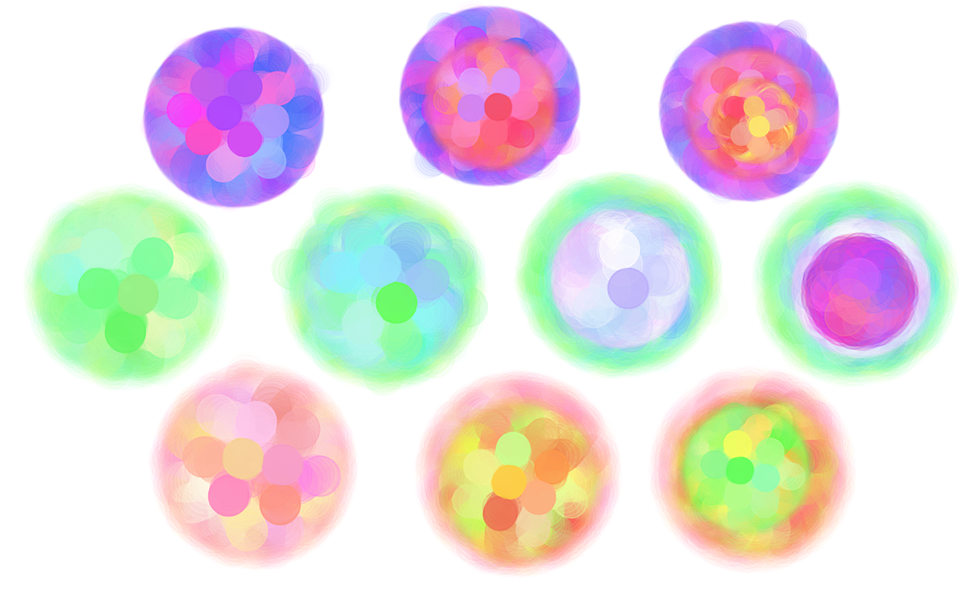
These colorful circles show progressions where smaller blobs of different colors are repeatedly layered on top of larger blobs. For example, in the middle row, I started by creating a row of green blobs with a disc radius of 30 and disc persistence of 30. Then I filled in the three rightmost discs with blue blobs using a disc persistence of 25. Then I filled in the two rightmost discs with light purple blobs with a disc persistence of 20. Finally, I filled in the rightmost disc with a dark purple blob and disc persistence of 15. The result is a blob of many colors with fuzzy borders.
In the bottom orange row, I repeated this procedure but reducing disc radius instead of disc persistence. Here, the borders between colors are more distinctive and individual discs are more visible compared to the middle row because they didn't fade out as much. In the top purple row, I combined both techniques.
Velocity vectors and rotation
Displaying velocity vectors is occasionally useful. For example, the below image liberally employs velocity vectors to convey motion, shading, and complex textures.
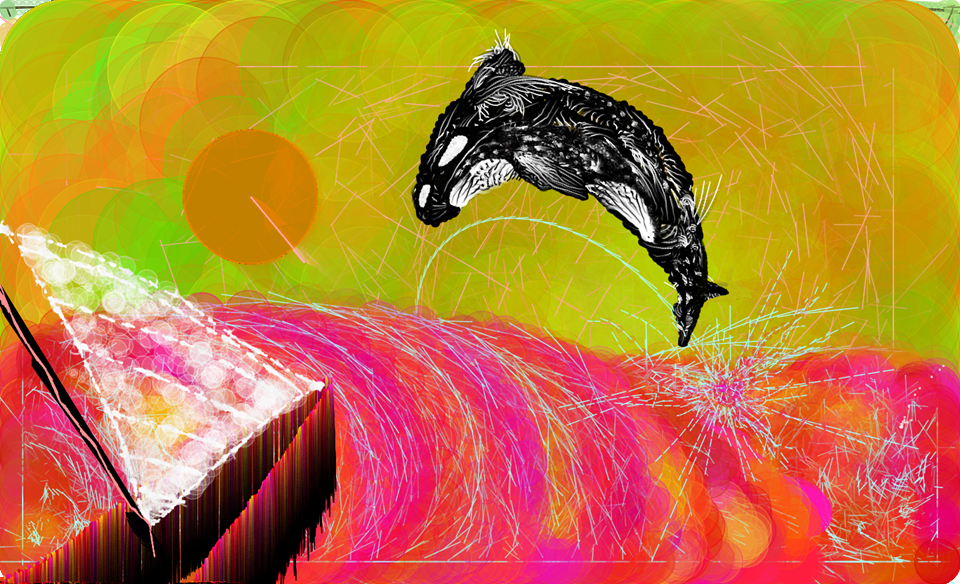
In the above image, the velocity vectors in the sea (the cyan lines) serve to emphasize the churning of the water and explosive breaking of the orca. The "churning" is the result of discs forming unstable vortices, which happens emergently amid conditions of strong gravity, a zeroed out coefficient of restitution and zeroed out friction and is captured well by velocity vectors. The explosion is the result of discs experiencing high gravity with a high coefficient of restitution.
On the hull of the boat, the velocity vectors serve as shading/shadow. The smooth gradient from light (disc) colors to dark (velocity vector) colors occurs because disc afterimage become more transparent as discs reach the end of their lives while velocity vectors do not.
Lastly, the orca itself has a distinct texture making use of velocity vectors. In practice, combining more impressionistic/painterly elements with the jaggedness of velocity vectors is challenging, so one typically must choose one or the other.
Non-physical behaviors
At high time-steps (e.g. 0.1), maximum downforce (e.g. 2000), and low disc radius (e.g. 1), the discrete movements of discs and subtleties of collision handling become visible. If you just pour tiny discs on a single point on your screen, you can produce complex like these:
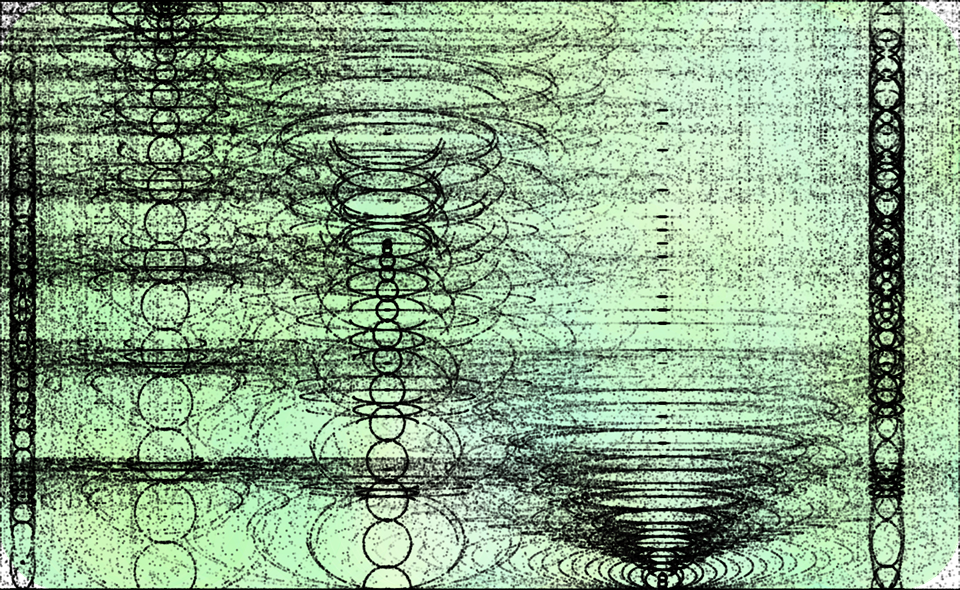
When discs are added to physics-tank, there's +/-1 pixel noise in the x and y directions. Also, when discs overlap (which happens if you're adding discs to a single spot on the canvas), they are pushed away from each other along their center-to-center lines. I imagine these behaviors introduce some kind of radial symmetry which gives rise to circles. These then get warped as discs travel in response to downforce to give various cool patterns.
You can also use these patterns as a kind of trippy paintbrush, since they will follow your cursor if you drag it while creating discs. Here's an example of my own:
Conclusion
As you can see, simple physical dynamics like gravitational attraction, elastic/inelastic collisions, and downward forces can be used to create cool pictures. Here, we've gone over some of the more common techniques but I hope you'll experiment on your own to find more!